How to Grow Aloe Vera at Home: A Beginner’s Guide

Learn how to grow aloe vera at home with this beginner’s guide. Discover tips on potting, watering, light, and care for a thriving aloe vera plant.

grow aloe vera

How to Grow Aloe Vera: A Step-by-Step Guide.

Are you wondering how to grow aloe vera at home? Well,  aloe vera is a versatile, low-maintenance succulent that thrives indoors or outdoors, making it one of the perfect plants for beginners. Known for its soothing gel and attractive, spiky leaves, aloe vera is both a functional and decorative addition to any home. In this beginner’s guide to growing aloe vera, we’ll cover everything you need to know to cultivate a healthy aloe plant, from choosing the right pot to troubleshooting common issues. Whether you’re a first-time plant parent or looking to expand your green collection, this guide will help you grow aloe vera successfully.

Why Grow Aloe Vera at Home?

Aloe vera is one of the best house plants and many people love it because of its benefits. To begin with, aloe vera is popular for its medicinal properties. Aloe vera gel has been used for many years as an agent of easing sunburn pain as well as treat cuts, stings, acnes, and scrapes.  Furthermore, aloe vera is known for its air-purifying qualities meaning that it can help clean the air you breath while also brightening your space. It’s also incredibly easy to care for, requiring minimal attention. Growing aloe vera at home allows you to enjoy its benefits while adding a touch of greenery to your space. Plus, it’s a budget-friendly plant that’s perfect for small apartments or sunny gardens.

What You’ll Need to Grow Aloe Vera

Ensure you have these essentials before diving into these steps:

  • Aloe vera plant or cutting: Purchase a young plant from a nursery or propagate from a cutting.
  • Well-draining pot: A terracotta or clay pot with drainage holes is ideal.
  • Succulent potting mix: Alternatively, mix regular potting soil with sand or perlite.
  • Bright, sunny spot: A windowsill or outdoor area with indirect sunlight.
  • Watering can or spray bottle: For controlled watering.

Step-by-Step Guide to Growing Aloe Vera

  1. Choose the Right Pot and Soil

    Aloe vera hates sitting in water, so proper drainage is key. Select a pot with drainage holes to prevent root rot. Terracotta or clay pots are excellent because they allow moisture to evaporate. Use a cactus or succulent potting mix, which drains quickly. If you’re making your own, combine equal parts potting soil, sand, and perlite for optimal drainage.

    Pro Tip: Ensure the pot is slightly larger than the plant’s root system to allow growth but avoid oversized pots that retain too much moisture.

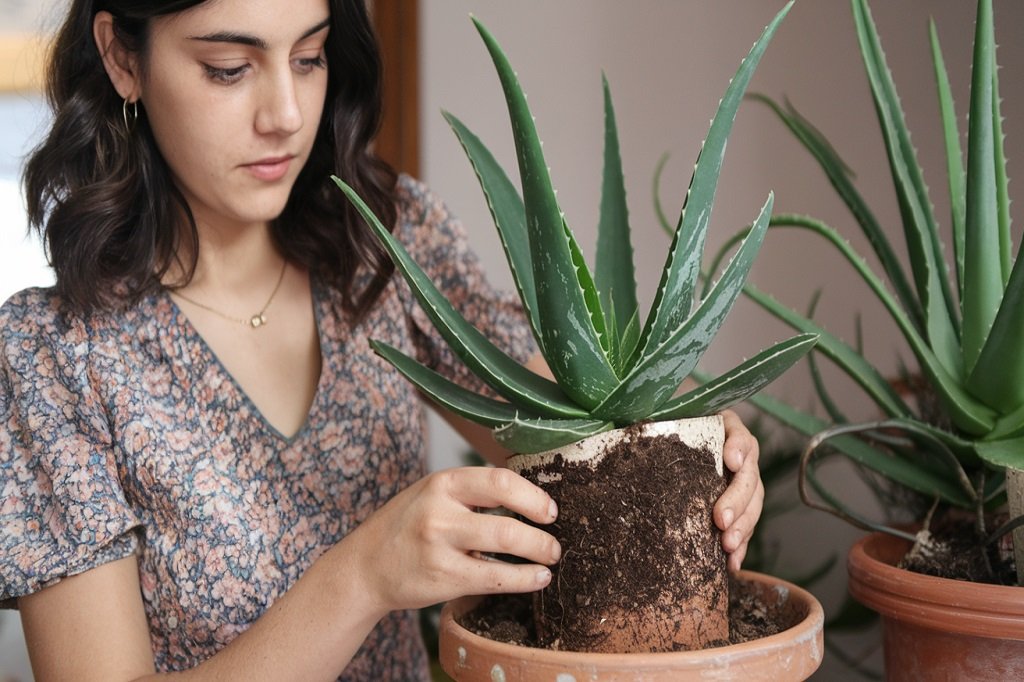
  2. Plant Your Aloe Vera

    If you’re starting with a young aloe vera plant:

    • Place a layer of pebbles or small rocks at the bottom of the pot to aid drainage.
    • Fill the pot halfway with the potting mix.
    • Position the aloe vera in the center, ensuring the roots are covered but the base of the leaves sits above the soil.
    • Gently press the soil around the plant to secure it.

    For propagation from a cutting or “pup” (a small offset from a mature plant):

    • Let the cutting dry for 1–2 days until the cut end forms a callus.
    • Plant the cutting in the soil, keeping it upright.
  3. Provide the Right Light

    Aloe vera thrives in bright, indirect sunlight. Place it near a south- or west-facing window if indoors. Outdoors, choose a spot with partial shade to avoid scorching the leaves. If the plant’s leaves start turning brown or curling, it may be getting too much direct sun.

    Pro Tip: Rotate the pot every few weeks to ensure even light exposure and prevent the plant from leaning toward the sun.

  4. Water Sparingly

    Aloe vera is a drought-tolerant succulent, so overwatering is its biggest enemy. Water deeply but infrequently:

    • In spring and summer, water every 2–3 weeks, allowing the soil to dry out completely between waterings.
    • In fall and winter, reduce watering to once a month.
    • Always check the soil’s dryness by sticking your finger an inch into the soil. If it feels moist, wait a few more days.

    Pro Tip: Avoid letting water sit in the plant’s rosette (the center of the leaves), as this can cause rot.

  5. Maintain the Right Temperature

    According to Rankel, aloe vera prefers warm temperatures between 55°F and 80°F (13°C to 27°C). It can tolerate slightly cooler conditions but should be protected from frost. If you live in a cold climate, bring outdoor aloe plants indoors during winter.

  6. Fertilize Occasionally

    Aloe vera doesn’t need much fertilizer. Feed it once a year in spring with a diluted cactus or succulent fertilizer (follow package instructions). Avoid over-fertilizing, as this can harm the plant.

  7. Watch for Pests and Problems

    Aloe vera is relatively pest-resistant, but watch for:

    • Mealybugs or scale: Wipe leaves with a damp cloth or use neem oil for infestations.
    • Root rot: Caused by overwatering; ensure proper drainage and reduce watering.
    • Brown, mushy leaves: A sign of too much water or poor drainage.
    • Yellowing or thin leaves: Indicates too little light or underwatering.

Tips for Long-Term Aloe Vera Care

  • Repot every 2–3 years: Refresh the soil and move to a slightly larger pot if the plant outgrows its current one.
  • Harvest gel sparingly: Cut a lower leaf close to the base, slice it open, and scoop out the gel for home use. Don’t remove too many leaves at once.
  • Propagate pups: Remove offsets (small plants growing at the base) and replant them to grow new aloe vera plants.
  • Clean the leaves: Gently wipe dust off the leaves with a damp cloth to keep them healthy and shiny.

Common Mistakes to Avoid

  • Overwatering: This is the most common cause of aloe vera death. Always let the soil dry out completely before your next watering.
  • Poor drainage: Ensure you use a well-draining pot and soil mix to prevent soggy roots.
  • Too much direct sun: Gradual exposure to sunlight prevents leaf burn.
  • Ignoring pests: Check regularly for signs of bugs to catch issues early.

FAQs About Growing Aloe Vera

Q: How often should I water my aloe vera?
A: Water every 2–3 weeks in spring/summer and once a month in fall/winter, ensuring the soil dries out completely.

Q: Can aloe vera grow indoors?
A: Yes, aloe vera thrives indoors near a bright, sunny window with indirect light.

Q: Why are my aloe vera leaves turning brown?
A: Brown leaves may indicate too much direct sunlight, overwatering, or poor drainage.

Q: How do I propagate aloe vera?
A: Remove pups from the base of a mature plant, let them dry for 1–2 days, and plant in well-draining soil.

Conclusion

Growing aloe vera at home is a rewarding and straightforward project for beginners. With the right pot, well-draining soil, bright light, and minimal watering, your aloe vera will thrive for years. Not only will you enjoy its aesthetic appeal, but you’ll also have fresh aloe gel for minor skin issues or DIY beauty recipes. Start your aloe vera journey today and transform your home with this resilient, low-maintenance plant!

How to Repot Aloe Vera Plant: A Step-byStep Guide

How to Repot Aloe Vera Plants: A Step-by-Step Guide

Learn how to repot aloe vera plants at home with this step-by-step guide.

You will agree with many plant enthusiasts that aloe vera is one of the easiest houseplants to grow because it easily adapts to indoor conditions. However, understanding when and how to repot aloe vera plants is vital in ensuring they blossom and remain healthy for many years. So, when should you repot your aloe vera? Well, read through this step-by-step guide and understand the signs to look out for. Furthermore, learn how to carefully repot aloe vera plants so they will continue to grow and blossom with ease.

When to Repot Aloe Vera Plant

Repotting aloe vera after a couple of years is important because it ensures that it remains healthy. Consider repotting your aloe vera plant when you witness the following situations:

  1. The plant is newly bought: Normally, many vendors sell aloe vera plants in standard potting soil. Many are the cases when the soil is not purposed for long-term growth and is not well-drained. Therefore, repotting your aloe vera plant into a new pot/container with well-draining and nutritious soil helps the plant live longer.
  2. Aloe Vera Plant Outgrows its Container: Aloe vera are heavy-rooted plants and easily outgrow a container. Therefore, once you notice that your aloe vera plant is becoming top-heavy with fat leaves or its offshoots are reaching the edge of the pot, consider repotting it. Aloe vera plants grow at a sluggish rate when in a tight space and, at times, stop growing at all if they fill the pot. Hence, repotting the aloe vera in a larger pot enables it to access more nutrients and water, thereby enhancing new growth
  3. Pests Invade Your Plant: When you notice pests or fungus around your aloe vera plants, repot them immediately. Pests such as fungus gnats are common houseplant pests that infest potting soil. Therefore, repotting your aloe vera plant using a fresh soil mixture and in a new container is one of many ways to eliminate the pests.
  4. It flourishes into a Root-Bound Plant: Root-bound plants have firmly packed roots that nearly fill the pot or container. You can tell if your plant is root-bound when you notice roots emerging from the bottom of its container. Repotting your aloe vera ensures that its roots get more space to grow, thereby ensuring increased access to water and better airflow.

How to Repot Aloe Vera Plant, Step-by-Step

Repotting aloe vera is not hard. However, it is different from other indoor plants because of various factors such as soil type, container type or potting soil mix to use. Here’s a step-by-step guide on how to repot aloe vera plants for maximum growth.

1. Select the Correct Container

    Ensure the new container is at least 2-3 inches deeper and 2 inches wider than the diameter of the aloe vera plant. Additionally, ensure the container is well-drained, allowing water to flow easily through it. It’s advisable to repot your aloe vera plant in a slightly wider pot than the original one because they do well in small pots/containers. Besides, small pots help your aloe vera plant grow easily in its new space.

    Tip

    While aloe vera can grow in glass, metal or plastic pots, it’s advisable to use a ceramic one. Porous ceramic pots are ideal because they allow free air flow through the pot therefore ensuring your soil dries out a less fast than it would in other containers.

    2. Fill ¾ of the new pot with nutritious soil mix

    Carefully fill ¾ of the new pot with a nutritious mix that includes rock and organic components. The rock component provides strength and air pockets for better drainage.

    3. Gently remove the aloe vera plant from its original pot

    Carefully remove the aloe vera plant from its original pot and remove a considerable amount of soil from the root ball.

    4. Examine the Roots

    Carefully examine for any issues with the plant’s roots. If some roots are intertwined, carefully unwind them before you repot the plant.

    Tip

    It’s ok to cut off some roots while you loosen them. This encourages new growth in your aloe vera plant.

    5. Cut off dead leaves

    If your aloe vera plant has dead leaves around the base, it’s advisable to remove them, thereby ensuring sufficient airflow and a clean plant. More space at the base of your aloe vera plant also allows the plant to dry faster, thus preventing rot from excess moisture.

    6. Remove offshoots

    Aloe vera plants propagate themselves by growing pups or offshoots. If your aloe vera plant has some offshoots (pups) at the base of the mother plant, consider removing them and transplanting them into well-drained containers.

    6. Plant the aloe vera plant in the new container

    Make a small hole in the top of the soil mixture and strategically position your aloe vera plant. Ensure the roots are fully covered with soil, but keep the leaves exposed.

    7. Delay watering your newly repotted plant

    Delay a day or two before watering your newly repotted aloe vera plant. This allows the disrupted roots to heal before being soaked with water. Later, water the soil without directly touching the aloe vera plant. Additionally, allow the soil to dry between your watering sessions. This is important because it allows your aloe vera plant to get accustomed to the new conditions.

    FAQ

    1. Is aloe vera plant pet-friendly?

    While aloe vera gel is safe, aloe vera leaves are toxic to cats and dogs and can cause diarrhea, vomiting, and lethargy. Consider placing your aloe vera plant on a high shelf away from your pets.

    2. Does aloe vera need light?

    Aloe vera needs enough light to blossom. Therefore, placing your aloe vera near south-facing windows with good access to light is ideal.

    3. Can I use aloe vera gel directly from the plant?

    There is no harm in using aloe vera gel straight from the plant. You can cut off a new leaf, depending on the thickness, and use it on your skin. Aloe vera gel is ideal for sunburns and other skin irritations.

    The Most Toxic Flowers to Cats

    The reason for the cat’s roaming patterns is based on the notion of curiosity. They will always sniff at some things or even touch them, while others might try to chew them completely. For cats, curiosity has no boundaries when exploring new territories. In contrast to this, however, numerous flower and plant species do not have any business next to your pet’s mouth because they would be harmful to it. Therefore, pet owners must be careful when choosing plants and flowers around their cats, as some can be poisonous. This guide will highlight the most toxic flowers to cats and also offer some practical ideas for safeguarding them against these concealed hazards.

    Reasons Some Flowers and Plants Are Toxic to Cats

    As a defense against herbivores and pests, plants and flowers release a variety of chemical substances. Sadly, cats can be injured or even killed due to these substances. Some of the poisons found in this plant include oxalates, saponins, glycosides, and alkaloids. These toxins affect the internal processes of a cat. Therefore, your cat may show signs such as diarrhea, vomiting, excessive drooling, or difficulty breathing.

    Interesting read, human food to feed your dog

    In extreme cases, they could develop organ failure or die altogether.
    There are various reasons why plant poisoning affects cats more often than other pets. Cats explore their surroundings with their mouths, giving poisons easy access to their bodies. Cats explore any new vegetation in their environment due to their good sense of smell. In addition, cats are obligatory carnivores. This means they need certain vitamins from animal proteins. They nibble on plants as a means of looking for such minerals.

    Common Flowers That Are Toxic to Cats

    1. Tullips

    To begin with, tulips are one of the most toxic flowers to cats. They are known for their vivid colors. However, their color can be deceitful as they pose a threat to the health of the cat.

    Tulips contain tulipalin, a toxic compound in the bud, leaves, and stem. Any piece of tulip that a cat bites or eats may lead to symptoms like diarrhea, vomiting, and drooling. In severe cases, tulip poisoning may cause breathing problems and heart complications.

    2. Daffodils

    The alkaloid lycorine produced by daffodils may induce nausea, vomiting, diarrhea, stomach ache, and sometimes arrhythmias in the heart.

    The most harmful part of these plants is found in the bulbs.

    3. Orchids

    Orchids are charming and exotic plants grown in homes, although a few of them are harmful to cats. Most orchids are non-poisonous, but some contain minor poisonous substances that can lead to stomach problems when consumed. For instance, although rare, vomiting and diarrhea may occur.

    4. Azaleas and Rhododendrons

    Azaleas and Rhododendrons belong to the Erinaceae family and have toxins that damage the cat’s nerve cells. Therefore, your cat will exhibit signs like vomiting, diarrhea, tremors, and profuse salivation. The plant is said to be harmful in all sections.

    5. Cyclamen

    Cyclamen, despite being a vibrant and popular houseplant with foliage and blossoms that attract attention due to their beauty, is lethal to cats. The tuber is the deadliest part of the plant; its saponins can result in serious gastrointestinal problems. Symptoms associated with cyclamen poisoning include drooliness, vomiting, diarrhea, and, in extreme cases, heart arrhythmia or convulsions.

    6. Dieffenbachia

    Dieffenbachia is popularly known as dumb cane since it has big broad leaves that are very beautiful thus making it one of the commonly grown indoor plants. If consumed by a cat, however, it could cause acute oral irritation arising from calcium oxalate crystals found within it. Signs include drooling, vomiting, and swallowing difficulties, along with swelling inside the throat. In the worst cases, such swelling may render an individual unable to breathe. 

    7. Lilies

    Lilies are among the plants that are highly toxic to cats. Pollen is one of the most hazardous elements in plants which leads to severe kidney failure. Rarely, when taken even in tiny doses, it may kill cats. Keep these flowers away from curious kitties. Lilies are among the plants that are highly poisonous to cats. This pollen is considered one of the most dangerous substances inside this family that can cause chronic renal failure disorders; therefore, they should always be stored far away from feline curiosities.

    8. Oleander

    Oleander acts as a beautiful, poisonous shrub that not only affects humans but also kills cats. There are heart glycosides that can cause a lot of problems if they are taken in. Oleander poisoning can cause tremors, erratic heartbeat, vomiting, diarrhea, salivation, and even death in severe circumstances. Oleander is so poisonous that it must be kept out of reach from cats, even though small quantities may be fatal.

    9. Sago Palm

    Toxins found in sago palms can make cats throw up, have diarrhea, become lethargic, have seizures, or even have liver failure. The seeds or nuts are the most toxic parts of the plant.

    10. Tulip and Hyacinth

    Cats cannot handle tulip and hyacinth bulbs, despite their common use in gardens and flower arrangements. Ingestion of these two plants’ alkaloids can cause serious digestive problems. Symptoms of poisoning include drooling, vomiting, diarrhea, or, in more severe cases, shortness of breath and increased heart rate. Because bulbs contain high levels of poisons, it is important to keep cats away from them.

    How to Protect Cats Against Toxic Flowers

    1. Minimize access

    The most recommended way to protect your cat from toxins found in plants and flowers is to prevent them from having access. Be on lookout for any plant or flower that maybe poisonous to your cat in the house and garden.

    2. Select Cat Friendly Flowers or Plants

    Select safe cat plants that are non-toxic, such as cat grass, Boston ferns, and spider plants. These cat friendly plants can let some greenery into your home without putting your kitties in danger at all. If you must maintain poisonous plants, put them somewhere your cat cannot get to, like high shelves or rooms the cat is not allowed into. Provide your cat with safe snack options, such as catnip or cat grass. This can lessen the chance that they will chew on harmful plants while still satisfying their curiosity.

    3. Learn More!!

    Keep yourself informed about flowers and plants that are poisonous to cats regularly. There are always new plants available, so being knowledgeable can help you steer clear of any potential risks. Monitor your cat’s behavior when it’s around plants.

     Some of the signs to look out for cat poisoning from a cat include vomiting, drooling, and lethargy. If they persist, always take them to your vet. Consider using deterrents or barriers to keep your cat from the plants. You can either use aluminum foil on pot tops, motion detectors, or bitter spray that allows you to keep the felines away from any poisonous plant.

    Conclusion

    If you suspect that your cat has ingested a hazardous flower immediately contact your vet because urgent action leads to the best outcomes. Taking easy steps and being informed allow you to create secure and suitable conditions for your treasured feline pets’ growth. Just remember that prevention is the key to ensuring your kitties are safe when it comes to poisonous plants and flowers.

    10 Best and Healthiest Human Foods That Dogs Can Eat

    As pet lovers, we love spending quality time with our furry buddies. Sometimes, we play games, enjoy homemade treats, or even share food. However, many pet lovers wonder, “Are there human foods that dogs can eat?” or “What human foods can my dog eat and what can’t it eat?” Others ask their veterinarians to recommend the best and healthiest human foods that dogs can eat.

    Worry no more! The good news is that many veterinarians agree that there are human foods that dogs can eat. For example, there are plenty of dog-friendly veggies, fruits, and meat products. When prepared properly, these dog-friendly foods provide wholesome and healthy benefits to your fur friend.

    This guide lists some of the best and healthiest human foods that dogs can eat.

    Important note: Some human foods can be toxic to dogs. Find a complete guide from the ASPA (America Society for the Prevention of Cruelty to Animals) website about some human foods that are toxic to your dog, even in small or moderate quantities.

    Courtesy: America Society for the Prevention of Cruelty to Animals-ASPA

    1. Cooked but Unseasoned Eggs

    To begin with, cooked but unseasoned eggs are one of the recommended human foods dogs can eat. Scrambled or hard-boiled, cooked eggs are rich in Vitamin D, protein, riboflavin, and selenium, all contribute to a healthy dog.

    Important note: Ensure the eggs are well cooked. Raw eggs can contain salmonella, which can poison your dog.

    2.  Cooked Chicken or Turkey but Unseasoned

    Unseasoned chicken or turkey is rich in proteins for your dog. Additionally, chicken has low fat content, making it an ideal meal for your canine. However, chicken or turkey should be offered as a supplement rather than a main food source.

    Important note: Remove bones before feeding your dog chicken or turkey. This reduces the risk of choking and also damages their gastrointestinal tract.

    3. Cooked Fish (Unseasoned)

    Cooked, unseasoned fish is yet another human food that dogs can eat. Fish, especially salmon and sardines, are rich in amino acids, omega-3 fatty acids, and proteins, which make them a healthy delicacy for your dog. However, just like chicken and turkey, ensure all bones are removed, thus preventing choking hazards.

    4. Cooked Green Beans

    Does your furry friend love green beans? Well-cooked green beans are another nutritious meal you can feed them. Veterinarians recommend them because they contain Vitamin C, fiber, and other beneficial nutrients. Furthermore, cooked green beans are recommended for overweight dogs because they are low in fats and calories.

    5. Peanut Butter

    Many people love peanut butter, and so do dogs. ASPCA recommends using peanut butter as “an ingredient in pet-friendly recipe or as a way to hide medication.” However, they warn that dog owners should check ingredient labels and ensure that the peanut butter of their choice does not contain xylitol (a sugar substitute that can be toxic to dogs). Peanut butter contains beneficial nutrients such as vitamins E and B and fiber. These nutrients are good for your dog’s digestive and cardiovascular health.

    6. Cooked Pumpkin

    Additionally, cooked pumpkin is a nutritious and healthy meal for your dog. It’s rich in Vitamins A, C, and E, beta-carotene, iron, potassium, and fiber. These rich nutrients are beneficial to your dog’s digestive system.

    Important Note: If you plan to use canned pumpkin, ensure it’s pure and does not contain additives.

    7. Carrots

    Additionally, carrots are another delicious human food that dogs can eat. They are rich in Vitamin A, fiber, and beta-carotene. Just like bones, carrots are a choking hazard, especially for young dogs. Hence, chop them into small and manageable pieces for your puppies.

    8. Mango

    Mangoes are a good delicacy for your dog. They contain beneficial nutrients such as vitamins A, B6, C, and E.  Before feeding your dog this tropical fruit, remove the peel and pit because they can make your dog sick. Furthermore, feed mangoes in moderation because they can cause stomach issues for your dog.

    9. Cooked Spinach

    Cooked spinach is another delicious food that you can feed your dog. It contains Vitamins K, C, and A, potassium, and fiber. Unlike other vegetables, spinach does not need to be chopped because it is soft and leafy.

    10. Unseasoned Cauliflower

    Cauliflower is another beneficial human food you can feed your dog. It is packed with beneficial nutrients such as potassium, magnesium, fiber, antioxidants, Vitamins B6, C, and K, phosphorus, and manganese, among others. You can opt to feed your dog either cooked or raw food. However, ensure it is unseasoned.

    Final Thoughts on Human Foods that Dogs Can Eat

    Ensuring the well-being of your furry friend is essential. This list of the best and healthiest human foods that dogs can eat is just a guide to the best-balanced human foods you can feed your dog. Be sure to ask your veterinarian about what works best with your dog.

    What are the Most Poisonous Foods for Dogs?

    Top Foods That Are Poisonous for Dogs

    What are the Most Poisonous Foods for Dogs?

    Some of the most poisonous foods for dogs include:

    1. Chocolate

    Do you love chocolate carrying chocolate to your home? Well, chocolate contains caffeine-theobromine compounds (especially dark chocolate) that lead to vomits, diarrhea, and convulsions in dogs. Next time you have one in your home, ensure it stays away from your dog.

    2. Grapes and Raisins

    While they are sweet to humans, grapes and raisins contain toxins that are harmful to dogs. When ingested, dogs portray lethargic behavior, anorexia, and emesis symptoms. Besides, even small amounts of grapes or raisins could cause acute kidney failure in your dogs. Therefore, it is ideal to ensure your dog stays away from them.

    3. Onions

    All onions, whether raw, cooked, or powdered; have compounds that can become toxic to a canine’s red blood cells. When ingested, onions cause anemia that is manifested by weakness, vomiting, and difficulties in breathing.

    4. Garlic

    Garlic is another poisonous food that can cause stomach upset and reduce red blood cell levels in your dog’s body. It can take days for a problem of any sort to be evident. Some possible symptoms associated with garlic include weakness, vomiting, and the gums turning pale.

    5. Avocados

    While they may appear good, avocados contain persin, a toxin that can cause a dog to have diarrhea and vomiting, eventually causing fluid accumulation around the heart. Pet owners must prevent any access to avocados by their pets because some dogs tolerate them such as Chihuahuas while others like Bull Terriers do not.

    6. Xylitol (Artificial Sweetener)

    Artificial sweeteners are toxic to your dog. Pastries, candies, and sugar-free gums predominantly have xylitol which causes harm to dogs. So, once the dog eats any food item containing these substances, insulin is released quickly leading to hypoglycemia or low blood sugar. Consequently, they will experience seizures, and liver failure and may eventually die.

    7. Macadamia Nuts

    Additionally, macadamia nuts are yet another food that is poisonous for dogs. The toxicity from macadamia nuts can manifest through weakness, tremors, and vomiting heating. The slightest amounts of this food can make a dog very sick fast.

    8. Alcohol

    Dogs manifest greater sensitivity to alcohol influence than human beings. Ingesting alcohol can kill immediately or make dogs lose consciousness. Other symptoms included vomiting, difficulty breathing, and poor coordination.

    9. Coffee and Caffeine

    Coffee, tea, and other beverages containing caffeine are also poisonous to dogs. They contain Methylxanthines that cause vomiting, diarrhea, seizures, and rapid heartbeat, among other effects when consumed by your dog.

    10. Raw Dough

    11. Cooked Bones

    While raw bones are less harmful under certain conditions, cooked ones are fragile and therefore can splinter; thus dogs’ intestines may obstruct or tear apart.

    12. Cherries

    The amount of cyanide that cherries contain is not bearable for dogs. Ingesting cherries can cause red gums, affect breathing, and even death in severe situations.

    13. Raw Meat or Fish (Salmon Poisoning)

    When you feed your dog raw meat or seafood, you expose them to hazardous pathogens such as salmonella and E. coli. Besides, there is also a possibility of salmon served uncooked being infested with a parasite that is responsible for fatal salmon poisoning.

    14. Raw Eggs

    Raw eggs may appear safe for your dogs but they contain a significant number of salmonella bacteria that are, in fact, one of the familiar causes of food poisoning in dogs. An egg’s white element known as avidin reduces the body’s absorption rate of biotin leading to skin and coat problems.

    15. Salt

    Furthermore, large consumption of salt is poisonous to your dog. When dogs ingest large amounts of sodium ions from excessive salting, they can experience vomiting, diarrhea, trembling, and convulsions followed by death.

    16. Nutmeg

    Nutmeg contains myristicin, a harmful product that causes dangerous effects to your dog such as seizure attacks, increased heartbeat rate as well and hallucinations among many others within the canine species.

    17. Milk and Dairy Products

    As most dogs cannot digest lactose well enough it can make their tummy hurt causing bloating along with diarrhea.

    18. Corn on Cob

    The dog cannot be poisoned with corn grains but the cob can block intestines leading to surgical removal.

    19. Mushrooms

    Although not all, some types of mushrooms are poisonous to dogs as they lead to liver failure, vomiting, diarrhea, and seizures. When considering feeding your dogs some mushrooms, consult your veterinarian on the best type, one that will not cause any harm to them.

    20. Fat Trimmings

    Vets recommend one not feed their dogs foods that contain high levels of fat such as ham, bacon, or fat part as they result in pancreatitis. In addition, they may experience obesity and many other problems.

    Symptoms of Dog Poisoning

    Dog owners should be able to point out these symptoms of food poisoning, for when treatment is done right and restarts promptly, it can make a huge difference. The general symptoms presenting dog poisoning are as follows:

    • Vomiting: Often vomits, especially after eating some poisonous food.
    • Diarrhea: A dog will experience watery or loose stool that lasts for hours up to days.
    • Lethargy: This a state that defines unusual exhaustion or lack of interest or energy in a dog.
    • Seizures: Seizures will include falling, loss of consciousness, body stiffening, jerking, and/ or twitching.
    • Overdrooling: Your dog will experience sudden drool, blood-tinged, or with a very bad odor.
    • Breathing Problems: Various irregularities in breathing may be noticed. Some of them are panting excessively and breathing in large breaths.
    • Tremors: Involuntary shaking, commonly caused by ingesting toxins.
    • Collapse: This is due to fainting caused by either a lack of strength or an inability to stand.

    When To See a Veterinarian

    In case your dog ingests any of the substances in the poison list, you have to act fast to help prevent any signs from developing. You should call your vet immediately once you observe any sign of poisoning in your dog, such as vomiting, convulsions, or even difficulty breathing. In most toxic cases, it means everything is time-critical. Your veterinarian may recommend that you induce vomiting at home, but this should be done only with professional guidance. Always consult a doctor before attempting to treat poisoning on your own.

    FAQ: Poisonous Foods for Dogs

    Dogs have different metabolic systems compared to humans. Hence, some ingredients that are safe for humans can be deadly or harmful to dogs.

    2. Are dairy products safe for dogs

    Most dog breeds are lactose intolerant, implying that they struggle to digest dairy products once ingested. Once ingested, a majority of dairy products can result in stomach discomfort, diarrhea or even bloating.

    3. What are some of the symptoms of food poisoning in dogs

    Some symptoms of food poisoning in dogs include:

    • Vomiting
    • Diarrhea
    • Seizures
    • Excessive drooling
    • Breathing difficulties
    • Tremors or shaking
    • Collapse

    4. What should I do if my dog ingests something toxic?

    If you suspect that your dog has ingested harmful/toxic food, consult your veterinarian immediately.

    How to Clean a Microwave at Home – Tips and Solutions

    How to Clean a Microwave at Home – Best Solutions and Tips

    1. How to Clean a Microwave with Vinegar

    To clean a microwave using this method, you require:

    • 2 cups of water
    • 2 tablespoons of distilled white vinegar
    • Microfiber cloths

    Directions:

    Step 1: Microwave the vinegar-water mix for 5 minutes

    Use a microwave-safe bowl to mix vinegar and water. Place this mixture in the microwave and heat it high for five minutes. If you hate the same vinegar, add two drops of essential oil to a lovely aroma. Once it starts to boil over, allow it. The steam helps in softening all the grime.

    Step 2: Let it sit for 10 minutes

    Once the microwave stops working, let the mixture cool for 10 minutes before you open the door.

    Step 3: Remove the Mixture and Turntable

    Carefully remove the bowl from the microwave. Do not pour it yet, as you will require it later. In addition, remove the turntable, which will later be cleaned in the sink.

    Step 4: Wipe the Interior

    Use a microfiber cloth to wipe the interior of the microwave. Most of the mess will easily come off. In case you encounter stubborn spots, use a non-scratch scrubbing tool.

    Step 5: Wash the Turntable

    Remove the turntable tray and clean it in the sink using warm soap water. Scrub off any food particles or stains, then rinse and dry it before you place it back in the microwave.

    Step 6: Cleaning the Exterior

    To clean the exterior, apply an all-purpose cleaner to a clean cloth and utilize it to wipe down the exterior of the microwave. It is essential to avoid direct spraying on the control panel.

    2. How to Clean a Microwave with Lemon

    To clean a microwave using this method, you require:

    • 1 lemon
    • 1 cup of water
    • Microfiber cloths

    Directions:

    Step 1: Microwave the mixture

    Start by repeatedly rolling the lemon on a table to loosen the juices. Slice the lemon in half and squeeze all the juices into a microwave-safe bowl. Place the squeezed lemons into the bowl and add 1 cup of water. Microwave the mixture on high for 5-10 minutes.

    Step 2: Let it rest for 10 minutes

    Once the microwave has stopped, let the mixture rest in the microwave for an additional 10 minutes. This gives the steam to soften hard foods and stains in the microwave.

    Step 3: Remove the microwave bowl

    You can now carefully remove the microwave bowl from the mixture. Wipe any loosened grime using a microfiber cloth.

    Step 4: Cleaning the Interior

    Remove the turntable, which will be cleaned later in your sink with warm, soapy water. Interior of the microwave should be cleaned using a microfiber cloth. Avoid using any cloth that may cause scratches.

    Step 5: Turntable Cleaning

    Clean the turntable, support rollers, and microwave bowl in a sink. Ensure you use warm, soapy water and a microfiber cloth.

    Step 6: Exterior Cleaning

    Clean the exterior of the microwave using a dry microfiber cloth.

    3. How to Clean Microwave Filters

    Step 1: Remove and Soak the Filter

    Gently remove the filter and soak it in hot sudsy water. You can add baking soda to the mixture if the filter is extra greasy. Let it soak for 15 -30 minutes.

    Step 2: Scrub

    Now, remove the filter from the solution and clean it in the sink with a sponge.

    Step 3: Rinse and Dry

    Thoroughly rinse the filter and let it dry before replacing it in the microwave.

    Tips: How to Maintain the Microwave Clean for Longer

    Here are some useful tips to help you maintain the cleanliness of your microwave:

    1. Quick Cleanup of the Spills

    There is a likelihood that some food will spill when you microwave your food. It is recommended that such spills be cleaned up immediately when they happen. Postponing the process gives food time to dry and stick, which complicates the cleaning process.

    2. Utilizing a Microwave-safe Containers

    It is essential only to use microwave-safe containers. These containers are made in a way that does not affect how the microwave works. Using items made of aluminum foil or metals can result in damage to the microwave.

    3. Use Splatters to Cover the Food

    If you are heating or cooking food with a microwave, use microwave-safe lids to avoid messy splatters. Splatters result in stains, and they emit odors. As a result, it becomes challenging to clean.

    4. Cleaning and Replacement of the Microwave Filter

    For those individuals who own microwaves that have filters, conduct a regular checkup and clean the filters. Regular cleanup will help prevent clogging with grease. This clogging makes it hard to achieve proper ventilation.

    5. Don’t Slam the Door

    Please do not slam the microwave’s door as it interferes with the latching mechanism and the inside parts.

    How to Preheat a Pizza: The Best Methods

    The Best Ways to Preheat a Pizza

    1. The Oven/ Toaster Oven Method

    • Start by preheating the oven to 275°F (135°C).
    • Line a baking tray with foil to avoid the pizza sticking. In addition, this will make cleaning easy.
    • Insert your prepared baking sheet in the oven for 2 to 3 minutes. This will ensure the sheet is hot and assist crisp the crust.
    • Remove the baking sheet from the oven and place the cold pizza in it.
    • Return the baking sheet to the oven. You should cook for 5 to 10 minutes, depending on the crust you enjoy.

    The only downside of this method of heating your pizza is that it takes time.

    2. Air Fryer Method

    The primary role of an air fryer is to make food crispy, making it an excellent choice to reheat your pizza.

    Steps:

    • The first step is to preheat your air fryer for 2 to 4 minutes to 320°F (160°C).
    • Put the pizza slices in the air fryer basket. Arrange them so they do not overlap to achieve even heating and consistent cheese melting.
    • Reheat the pizza for about 3 or 4 minutes.
    • After 3 minutes, check if the pizza slices have been heated to your liking. Depending on the crust you desire, you may add a minute or two.
    • Avoid overheating the pizza, as the crust can become too hard, or the cheese will become too brown.
    • To achieve better reheating, you may cover your pizza with a lid, which will trap steam, ensuring your pizza does not become too dry.

    3. Stovetop Method

    Stovetop offers a quicker way to reheat pizza. If you decide to use this method, ensure you select a pan or skillet with a heavy bottom like stainless steel, since it retains heat well.

    Steps:

    • Place your pan over medium heat on the stovetop and let it heat for about 2 or 3 minutes.
    • Place the pizza into the pan. You can add a few drops of water to the edge of the pan. Remember, it should be away from the pizza.
    • Pizza slices should be arranged in a single layer and covered with a lid to trap moisture.
    • Warm on medium heat for 2 or 3 minutes until the bottoms become golden brown. In addition, don’t forget to check if all the cheese has melted.

    4. Microwave Method

    Discover How to Make Flowers Last Longer – 6 Tricks

    How to Make Your Flowers Last Longer

    Do you want to make your flowers last longer? Have you received a bouquet and are wondering how to prolong its freshness? Well, worry no more! A bouquet given as a gift, composed of very bright flowers can bring happiness, joy, and love to any space and remain in mind for a long time even after the petals have dropped. Even though flowers can bring about a sense of beauty and warmth in any place, their desirability is short-lived.

    1. Cut the Stem

    Proper stem cutting is essential for extending the life of your cut flowers. When you are arranging the flowers, you should utilize a sharp knife or employ scissors to make clean cuts. It is important to use a sharp knife as dull blades cause the stem of the flowers to break which blocks the water flow.

    In addition, you should cut the stems at a 45-degree angle. This angled cut enables easier water absorption hence better hydration ability by flowers. Mostly you should cut 1-2 inches from the bottom side of the stems.

    This length guarantees that the flowers fit the vase properly while facilitating improved water absorption. Remove any leaves that you see in the water to stop them from rotting and from growing bacteria.

    2. Prune excess Leaves

    Pruning is a critical but frequently overlooked aspect of flower care. Removing extra leaves can extend the life of your flowers. Use sharp scissors to remove these lower leaves, ensuring that only healthy leaves remain above the water.

    Pruning improves water absorption and prevents rot. The flowers may concentrate their efforts on watering and blossoming. This approach can result in healthier, more vibrant arrangements that last longer.

    3. Optimize Flower Placement

    Flowers should be kept out of direct sun and heat sources. Heat can quickly dry up flowers, while direct sunlight might cause them to wilt too soon. Instead, pick a spot with plenty of indirect light, like next to a window that has sheer curtains.

    Apart from steering clear of direct sunlight and heat, take into account the room’s overall temperature. The recommended temperature range for most cut flowers is 65°F–72°F (18°C–22°C). Flowers shouldn’t be placed next to appliances that produce heat, air conditioner vents, or heaters. Keeping the temperature constant will help to prolong the freshness of your flowers.

    4. Use Fresh Water

    A clean and high-quality water supply is essential to proper flower care. Change the water every two to three days. The stems stay hydrated with fresh water, preventing any bacterial growth from taking place. After substituting the previous water with a new one, ensure that you appropriately clean up the vase to eliminate any likely presence of bacteria or deposits.

    Additionally, use warm water and soap to scrub your vase thoroughly. You can use a sponge to do away with any bacteria that might have remained. Ensure to rinse completely so as not to leave any soap residues which may turn out harmful to flowers. In case you wish, add fresh water that has room temperature back into the vase after cleaning, flower food may also be added here.

    5. Promptly Remove Wilting Flowers

    Some flowers may fade or wilt unavoidably as they age. Wilted flowers must be removed as soon as you see them. Bacteria that infect dead flowers might harm the healthy flowers in the arrangement. By taking away these wilted flowers, your floral arrangement will retain its good looks and overall well-being.

    Removing dead or dying flowers makes an arrangement look better as well as provides other healthy flowers a chance for further growth accompanied by an increase in their nourishment and moisture content.

    6. Flower Food

    The longevity of your cut flowers can be greatly extended with commercial flower food. Fresh flowers are usually nourished using a combination of sugar, acid, and biocides which serve to maintain a pH balance that favors development and prevents multiplication by harmful microorganisms. All this ensures that the plants remain fresh for longer periods since they have all that it takes for their growth.

    For DIY enthusiasts, it is easy to produce flower nutrient solutions at home with only a few items found in any house.

    Mix one quart of water with two tablespoons of white vinegar and one tablespoon of sugar. Bacteria growth is slowed down through the use of vinegar while sugar acts as an energy source making the blossoms last longer than normal. Combine and substitute this mixture for store-bought floral food.

    Additional Tips

    Different types of flowers vary in lifespan, particularly in longevity. However, some kinds will naturally outlive others.

    When buying or arranging flowers, knowing which blossoms last longer will help you make wise decisions. Their robust quality enables them to endure longer compared to fragile varieties like peonies or roses.

    Apart from these, the cut flower longevity depends on other factors such as moisture levels in the air, temperatures, and treatment given to them. They usually wilt fast when they lack care or when subjected to high-temperature conditions. Moreover, at the time of purchase, fresh flowers play a crucial role in determining how long they’ll last.  Here’s a quick summary of some common cut flower longevity:

    • Carnations: Up to 2 weeks
    • Alstroemerias: Up to 2 weeks
    • Roses: Up to 1 week
    • Hydrangeas: Up to 1-2 weeks
    • Peonies: Up to 1 week
    • Tulips: Up to 10 days

    How to Cook a Turkey like a Pro: A step-by-step Guide

    A Step-by-Step Guide on How to Cook the Best Thanksgiving Turkey at Home

    Do you know how to cook a turkey? Are you preparing and cooking a turkey for your family or friends? Is this your first time cooking, or would you like to enhance the flavor and presentation of the turkey? Well, roasting a turkey may look challenging at first. However, if you go through some processes and apply the appropriate technique, you will have a nice turkey dish for your lunch or dinner.

    This guide explains several aspects one needs to consider, such as how to season the turkey properly and pick an appropriate cooking method. It does not matter whether you’re an expert cook or just starting; these steps lead to juicy, tasty turkey that guests won’t easily forget. So, get ready, and let us guide you on how to cook a turkey at home.

    Preparing the Turkey

    Once you’ve settled on how much turkey you want to cook, it is time to start preparing one. You can use either a frozen turkey or a fresh one. But in most cases, fresh turkey gets the upper hand over its frozen counterpart, because it doesn’t need thawing.

    Long periods are necessary for the thawing process of frozen turkey. There is a method of thawing in refrigerating compartments whereby 24 hours are required for every five pounds of weight on your turkey.

    To begin with, take an empty pan and place the turkey there; immediately ensure this goes down the fridge’s lowest shelf. If you opt for refrigerating thawing, remember it takes 24 hours for every 5 pounds.

    Alternatively, wrap the piece of meat in wrapping paper and put it in a sink filled with cold water. Changing the water every thirty minutes is essential to keeping your turkey cool.

    Ingredients and Tools Required to Cook a Turkey at Home

    The following are the ingredients and tools you require to prepare a tasty turkey:

    Ingredients

    1. Turkey
    2. Salt and Sugar
    3. Herbs and Spices: Rosemary, thyme, garlic powder, sage, paprika, onion powder, black pepper.
    4. Aromatics: Onions, oranges, garlic, lemons.
    5. Olive Oil or Melted Butter
    6. Broth or Water

    Tools

    1. Roasting Pan and Rack
    2. Meat Thermometer
    3. Cutting Board
    4. Carving Knife and Fork
    5. Basting Brush or Bulb Baster
    6. Kitchen Twine
    7. Measuring Cups and Spoons
    8. Aluminium Foil
    9. Mixing Bowls
    10. Large Container or Bag
    11. Paper Towels

    How to Season the Turkey

    Start by cleaning the turkey using cold running water. Remember to clean it inside and out and dry it with paper towels. You can apply brine to your turkey to enhance the flavor.

    seasoning ingredients

    If you are using wet brine, then immerse your turkey for twelve to twenty-four hours in a saltwater solution containing spices, herbs, and sugar. Wash the turkey with cold water to avoid excess salt before cooking it, then dry it with paper towels.


    The turkey may also be dry brining, usually using kosher salt and a blend of sugar, herbs, and spices, which are later applied to the surface of the turkey. You can even rub some of this mixture beneath its skin or apply it inside its cavity. You later place your turkey on a rack set over a baking sheet and refrigerate it for 24-48 hours.

    Fresh rosemary or bay leaves can be used as stuffing components for the cavity to infuse the meat with flavor. Don’t forget about seasoning on top by rubbing a mixture containing olive oil and your preferred spices like paprika, salt, and pepper all over its skin.
    The last part of seasoning your turkey is to include aromatics for better taste.

    You may place onions and garlic cloves inside the cavity. When cooking the turkey, such aromatics usually permeate the meat with a delicious aroma. You should scatter fresh herbs around turkeys in roasting pans so that their aroma can enhance the flavor of the turkey. The melted butter should be brushed on to cover the outside of the turkey. You can add the rest of the seasonings over it if you have already covered it with butter.

    How to Cook a Turkey

    Roasting is how many people cook turkey. Preheating the oven to 325°F (163°C)  is the first thing to be done when cooking. Put a roast rack inside a roasting pan alongside the turkey that faces breast side up. This rack ensures that hot air flows through when cooking your turkey even more, which could provide crispy skin.

    The wings must be tucked under the bird so as not to burn. Add broth or a cup of water to the pan to prevent drippings from burning.

    In the next step, insert a meat thermometer into the thickest part of your turkey thigh, ensuring it does not come into contact with bone. Aluminum foil will then cover the turkey to prevent quick browning. During the last 30-45 minutes of roasting, remove the foil for brownish golden crispy skin to form on your turkey.

    Keep roasting until the turkey’s internal temperature reaches 165°F (74°C).

    The cooking times vary, but on average, it takes roughly fifteen minutes for each pound; therefore, the number of pounds being cooked should be the determinant factor of the time taken.

    Basting is when you brush some pan juices on top of a turkey so that it can have a pleasant taste and remain juicy. This is not essential but may enhance the flavor of the turkey. Every 30 minutes, one should baste the turkey to keep it moist. Regular juices used for basting include broth, melted butter, and drippings from a pan used for roasting meats.

    Turkey Resting and Carving

    Give it 20 to 30 minutes after restring the turkey from the oven. Use aluminum foil to cover it to keep it warm, and ensure it is not tightly wrapped to avoid the turkey getting soggy.

    Prepare the following essential items when carving the turkey: a knife, which should be sharp, a fork, and a cutting board.

    We need to start by removing the legs and thighs first, specifically, cutting through the skin and joining the legs to the body are what we need to do here. To remove the legs and thighs, gently pull away from the body until you reveal joints. Then, cut off the joint with a knife. If necessary, remove the thighs from the drumstick.

    The next step in carving is removing the breasts. To remove the breast in its entirety, cut down each side of the breastbone. Next, cut the breast meat into even sections by slicing it against the grain.

    Now carve the thigh meat. Slicing the meat off the bone requires a solid grip on the thigh. Cut the thigh meat into small pieces.

    Serving Recommendations

    Simply set the carved turkey on a big serving plate and decorate it with thyme or rosemary. You can serve it with your friend’s or family’s favorite options like mashed potatoes and cranberry sauce. Additionally, consider having a crunchy salad or vegetable platter alongside the turkey to make your food more elegant.

    Learn How to Apply Peel and Stick Wallpaper Like a Pro

    How to Apply Peel and Stick Wallpaper for Long lasting Results

    What You Will Need to Apply Peel-and-Stick Wallpaper

    Before you start the application of peel-and-stick wallpaper, ensure you have the following equipment and materials:

    Equipment/Tools

    Measuring tape

    • Pencil
    • Plastic smoothing tool
    • Utility knife
    • Straightedge
    • Sponge/Cloth

    Materials

    • Peel-and-stick wallpaper
    • Mild cleaner

    Step-by-Step Guide for Installing Peel-and-Stick Wallpaper

    Here is a detailed guide to help you install peel-and-stick wallpaper.

    Step 1: Get the Walls Ready

    The first step is to switch off the power where you intend to install peel-and-stick wallpaper. You can safely remove outlet covers and light switch plates by turning off the power.

    Clean your painted wall surface using a damp sponge and a gentle and non-abrasive cleaner. Give the wall at least 24 hours for the surface to be completely dry.

    During the inspection, you may notice cracks or holes. You can use wall filler and later sand the area to ensure smoothness. Always ensure you have a level surface. In addition, you are allowed to prime the wall if necessary.

    Some distinct peel-and-stick wallpapers must adjust to the room’s humidity and temperature before installation. Always read the manufacturer’s instructions for any requirements before beginning installation.

    Measure the wall area you intend to cover with peel-and-stick wallpaper to ensure you purchase the right amount. Remember, buying a slightly more significant amount is advised to help account for any errors or cut-offs.

    Step 2: Create a Guide for Your First Piece

    Get the width measurement of the peel-and-stick wallpaper. Using a pencil, note this measurement on the wall. Now, utilizing a straight and level, you should draw a line from the ceiling to the baseboard aligned with the marks. In this instance, the baseboard is the area you intend to cover. This guide is essential as it assists you when installing the initial strip of the wallpaper straight.

    Step 3: Apply the Peel-and-Stick Wallpaper

    Begin by peeling away around 12 inches of the adhesive backing, starting from the top of the wallpaper. Using the guidelines you drew earlier, align the wallpaper’s top edge. Beginning from the wall’s top. Slowly press the wallpaper against the surface. You should ensure that it aligns well with the guide. Utilize downward strokes featuring a plastic smoothing tool to remove air bubbles. Once the wallpaper is well secured to your wall, utilize a straightedge and a small utility knife to cut along the baseboard. You should pay attention during the cutting process to remove any excess wallpaper.

    Step 4: Match and Repeat Patterns

    When installing the other pieces, ensure you align the wallpaper pattern to achieve a flawless appearance. You should overlap your second piece a bit with the initial piece. Now, run the smoothing tool along the seam. This will help to keep it flat. You can then trim the bottom per the wall’s design and continue to cover the entire surface using this method.

    Step 5: Navigate Around Windows and Outlets

    During the installation of the peel-and-stick wallpaper, you will encounter a window, door frame, or outlet. In this case, you should allow the wallpaper to overlap it. Trim the excess wallpaper with a utility knife once you apply the piece. Now, smoothen the wallpaper against the wall around all edges of a window or outlet. Ensuring the power is off for both electrical outlets and switch plates, cut away the paper over the opening using a utility knife.  

    Step 6: Look for Air Bubbles

    Inspect your installation for air bubbles. Use the utility knife’s top to poke a small hole in the bubble’s center if you find any. You should then press down to release air and smooth the wallpaper.

    Frequently Asked Questions

    1. What Actions Should I Take When My Peel-and-Stick Wallpaper Starts to Fall Off?

    If your peel-and-stick wallpaper is falling off, carefully pull back the wallpaper. Now, clean the wall using a solution of 1/3 of water and 2/3 of isopropyl. In most instances, the wallpaper falls off due to a dirty wall, or it was installed correctly. Let it dry before trying to reapply your wallpaper. If the wallpaper does not stick after cleaning, the adhesive may be worn out, so you need to purchase new wallpaper sheets.

    2. How Long Will My Peel-and-stick Wallpaper Last?

    If you install the peel-and-stick wallpaper keenly and correctly, expect it to last five years or more. How long the wallpaper lasts depends on the quality of the wallpaper, the condition of the wall, and the room’s environmental conditions.

    3. How Should I Clean My Peel-and-stick Wallpaper?

    The most recommended way to clean the wallpaper is to utilize mild dish soap and a small amount of water. However, always check with your manufacturer in the most recommended way.

    Exit mobile version